Life feeling a little cluttered? You’re not alone! In fact, apparently 54% of Americans feel overwhelmed with clutter and don’t know what to do with it. I’ve personally allowed myself to be the victim of my own clutter, without even realizing how much it was affecting me. There is the obvious, like the added stress that comes from it. But there’s also the not-so-obvious, like wasted time and wasted money over time.
Don’t get me wrong, there is a healthy level of clutter. Especially those with children living in the house. But how much is too much? Well, if you find that you’re cleaning up before company arrives, or that you can’t find important documents when needed, it might be time for an overhaul. And if you don’t know where to even start, I got you! I created a printable checklist to help get your home clutter free in 30 days, and in turn, lower stress levels for you!
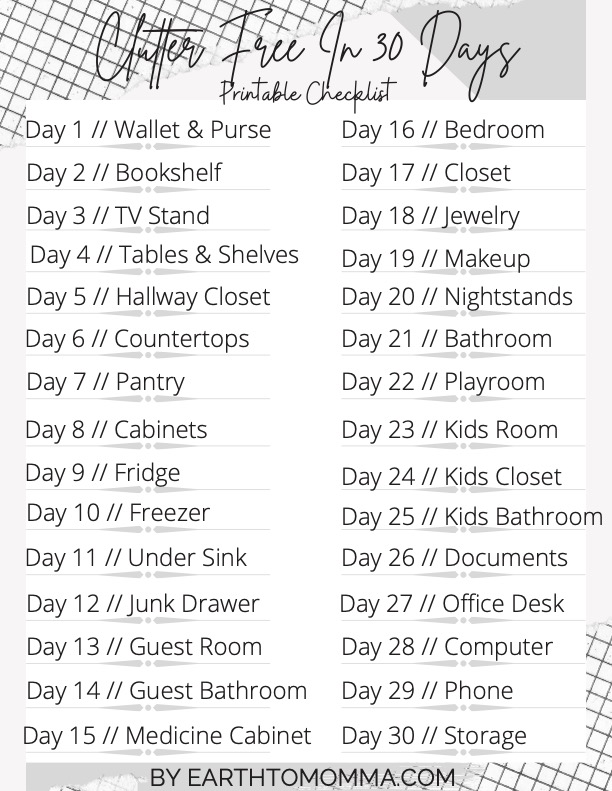
A Brief Explanation
In case it’s not obvious from looking at it, here’s what I mean for each day. (This is just a template – Feel free to replace any with something you feel is more important in your home!)
Day 1 – Wallet & Purse
This one I feel is pretty obvious. Go through your wallet and take out any change to put in a savings jar, organize your cards – financial and others), take out any old receipts to go through and file. Then go through your purse to do the same, get rid of any loose trash, and make sure it has everything you want it to and nothing you don’t. If you switch out wallets or bags, make sure to go through these too so you have ‘blank canvases’ in a sense from now on.
Day 2 – Bookshelf
Go through your bookshelf and donate any old, unwanted books (or take them to a reading library!) Go through any random items that have been collecting there over time and designate a permanent home for them. If you find that you’re having trouble trying to find a permanent home for something, it might be a sign that particular item isn’t necessarily needed in your home anymore. Finally, organize the bookshelf for accessibility first and style second.
Day 3 – TV Stand
This project is dependent on size. Smaller stands will be easier to clean and organize, obviously, but don’t stop until your whole stand is finished. First, start with sorting through any random items that have been collecting over time and do the same as in Day 2. Next, go through your CDs, movies, games, etc., and put them in their cases. Organize everything in a way that’s accessible yet stylish enough for you. Hidden cubbies and drawers are always a plus – but make sure not to just move your clutter there! Then dust everything down and finish with an optional air compressor to clean out electronic air vents, and optional polish.
Day 4 – Tables & Shelves
Go around and collect any random items that have been accumulating, and follow the same step as Day 2 and 3. Sort any items that may need to be moved to recycling, storage, or trash. Water any plants that have been neglected. Organize items in zones according to their purpose – i.e. pet stuff in one area, electronics in another area, kid stuff in another, and so on and so forth. Then dust everything down and finish with an optional polish. Remember to try to keep your decor to a minimal.
Day 5 – Hallway Closet
No matter what season you’re in, it’s always good to have a clutter free organization/storage space. From spare toiletries and linens, to coat and shoe storage, make the most of your space! Go through and get rid of anything that’s become tattered, worn-out, or just doesn’t serve a purpose anymore. It could be recycling, donating, selling, whatever you want. Take out the rest of the items and clean the surfaces. Organize the items into sections when putting them back – bathroom, bedrooms, entry, etc. Remember to organize them by accessibility and then design, and stock up on anything that hasn’t gotten attention in a while.
Day 6 – Countertops
*Refer to Day 4. The process is the same.
Day 7 – Pantry
Go through your pantry section by section. Get rid of anything that’s expired, donate any canned goods that won’t get eaten, and temporarily set aside what you’re wanting to keep. Clean and disinfect surfaces. When putting the items you’re keeping back, try to stick to a system that will save you time looking and also save you space storing. It’s completely optional to buy storage solution ideas, make your own, or work with what you’ve got. Perhaps create another system that helps you track what you’re running out of for easier recipes and shopping lists.
Day 8 – Cabinets
*Refer to Day 7. The process is the same including for non-food items.
Day 9 – Fridge
*Refer to Day 7. The process is the same but most likely won’t be any donations.
Day 10 – Freezer
*Refer to Day 7. The process is the same.
Day 11 – Under Sink
Everyone has a different layout under their sink, and that’s okay! But from garbage bags and dishwasher soap to lysol and windex, cleaning supplies is the number one category for under sink storage. Go through and combine any product leftovers. Wipe down both the cleaning supplies and under the sink. Properly dispose of any containers that are no longer being used. Create a system that will save you time looking and space to store if possible. Again, it’s completely optional to buy storage solution ideas, make your own, or work with what you’ve got.
Day 12 – Junk Drawer
Ahh, the junk drawer. The one place that’s actually meant for the clutter in the home. But when the clutter becomes too much, it becomes a problem for the rest of our homes and our mental sanity. Yes, junk drawers are completely fine. And just like I said in the beginning, if you’re not cleaning this up for guests and can find what you’re looking for, leave it alone. But, if yours could use the attention most people’s could, take everything out, clean the drawer, and start over. Don’t be afraid to get rid of items that are no longer serving a purpose.
Day 13 – Guest Room
Don’t change the sheets if no one has slept in there. Don’t vacuum if the room hasn’t had a foot step in since yours last did. We’re not focusing on cleaning here, just decluttering. Instead, go through and add a scented plug-in, or a sachet of potpourri. Restock and reorganize extra linens. Make sure any movies, knickknacks, and other random items have been put back in their permanent homes. The end goal is to make the space feel useful but not used.
Day 14 – Guest Bathroom
Again, we’re not focused on deep cleaning here, just feeling less overwhelmed. Make sure the soap on the counter is filled and there is a deodorizer for the air. Remember to check the fullness of the items in the shower/tub and restock if needed. Assess supply and restock any toiletries from women’s and men’s needs, to children’s needs, as well as towels and TP. Take out trash if need be and sanitize high-traffic surfaces.
Day 15 – Medicine Cabinet
Everyone’s medicine cabinet is different too, and that’s okay too! But from medicine and vitamins to bandaids and rash cream, the majority of people’s first aid needs are what’s stored in medicine cabinets. Go through and get rid of anything that’s expired. Then take everything out and set it aside temporarily. Label the items that are dangerous and need precautions – whether with a sticky note or label maker if you’re fancy. Put items back by category – i.e. pet needs, children’s needs, daily uses, and first aid. Try to keep it organized so everything is easily within reach and not crowded to where you have to rearrange items to find what you’re looking for.
Day 16 – Bedroom
Go through and pick up any dirty laundry first. Collect it all and immediately throw it in the wash. No clutter in the hamper either today. Put away any clean clothes. Then make the bed and pick up any pet or children’s items laying around to put away in their designated home. Organize any shelves the same as for Day 4. *Make sure you finish the laundry you started and put it away immediately. Sweeping, mopping, and dusting optional.
Day 17 – Closet
Go through and collect any odd-ball hangers. Put them at the front. Collect shoes from around the house and organize by need. Organize purses in a system that works for you. Whether that be keeping your most used nearby and switching them out every so often or hanging them all for ease of access no matter what. Organize the closet by needs, switching out seasonal items as needed. Make sure items have a designated home and can be reached or put away with ease.
Day 18 – Jewelry
*Refer to Day 17. The process is the same as the purses.
Day 19 – Makeup
This one also seems pretty obvious, at least from a woman perspective. Go through and get rid of any expired product. Clean all brushes and sponges. Create a system to help you both store and find your makeup with ease.
Day 20 – Nightstands
*Refer to Day 4. The process if the same.
Day 21 – Bathroom
*Refer to Day 14. The process is the same.
Day 22 – Playroom
Go through and clean up any items laying on the ground. Before putting them away, go through storage areas in the room to either donate unwanted items or get rid of broken, worn-out items. Organize storage areas based on preferences – i.e. loud toys, dress up, supervised toys, board games, etc. Sanitize surfaces and consider a deodorizer.
Day 23 – Kids Room
*Refer to Day 22. The process is the same.
Day 24 – Kids Closet
*Refer to Day 17. The process is the same but without purses.
Day 25 – Kids Bathroom
*Refer to Day 14. The process is the same.
Day 26 – Documents
From birth certificates and socials to immunization histories and marriage certificates, important documents should all be kept in one place. Invest in a binder with dividers and pockets so everything is easily with reach when looking for it, but also so everything can be taken in one grab in case of an emergency.
Day 27 – Office Desk
I don’t know about you, but this is probably my most cluttered space in my home. Probably because it gets the most use. First, go through any items that have accumulated and put them back in their designated home. Recycle, upcycle, donate, or get rid of anything that doesn’t have one. Then make sure you have an organization system in place to keep things in place when not needed and accessible when needed. Try breaking things down into categories and work tasks.
Day 28 – Computer
Clutter piles up quick on computers. Whether it’s things we saved because we needed it at some point, automatic downloads, or any other reason. One way this can be done is ‘utilizing storage’, a way that our computer automatically frees up space. The other way to do this is by manually by going through every folder and every item to see if it’s still needed or not. Not much else that can be done on this one.
Day 29 – Phone
*Refer to Day 28. The process is the same.
Day 30 – Storage
Whether it’s an attic, basement, or garage, storage can start to pile up. Go through and decide what absolutely needs to be kept and what can be let go. Sell some things, donate some things, recycle, and upcycle what you can. Then, as with the rest, organize into zones and categories to keep things easily accessible and less likely to pile up again.
There You Have It
So there it is. A printable checklist and explanation for each item to have your home clutter free and you less stressed in 30 days! Start whenever you want and keep at it until the whole thing is finished. And don’t forget you can switch out any item you want for one that applies to you. Until next time, I hope I’m able to help make your life as simple as could be!(:

